In this tutorial, you will learn how to configure the ESP8266 Wi-Fi module and establish a reliable connection with the SoifGo MQTT broker. We’ll cover the basics of MQTT, explain how publish/subscribe works, and guide you step by step to get your device online.
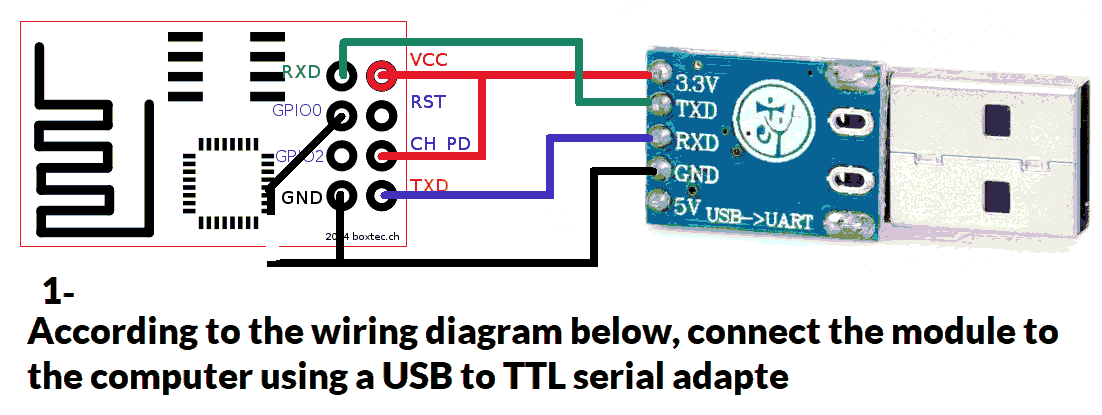
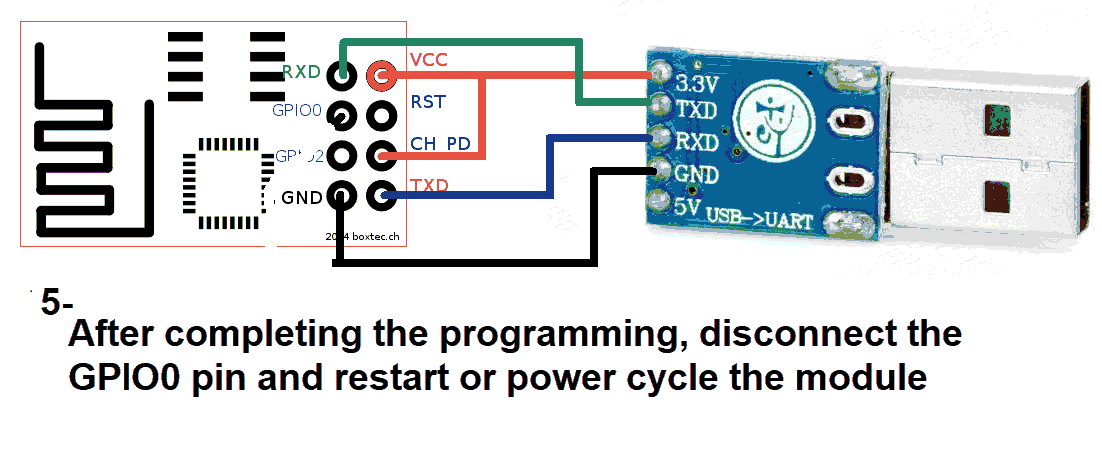
Use a USB to TTL converter. It can be a single USB-to-TTL board or a combination of USB-to-UART and UART-to-TTL.
You’ll need both 5V and 3.3V power sources. Recommended converter:

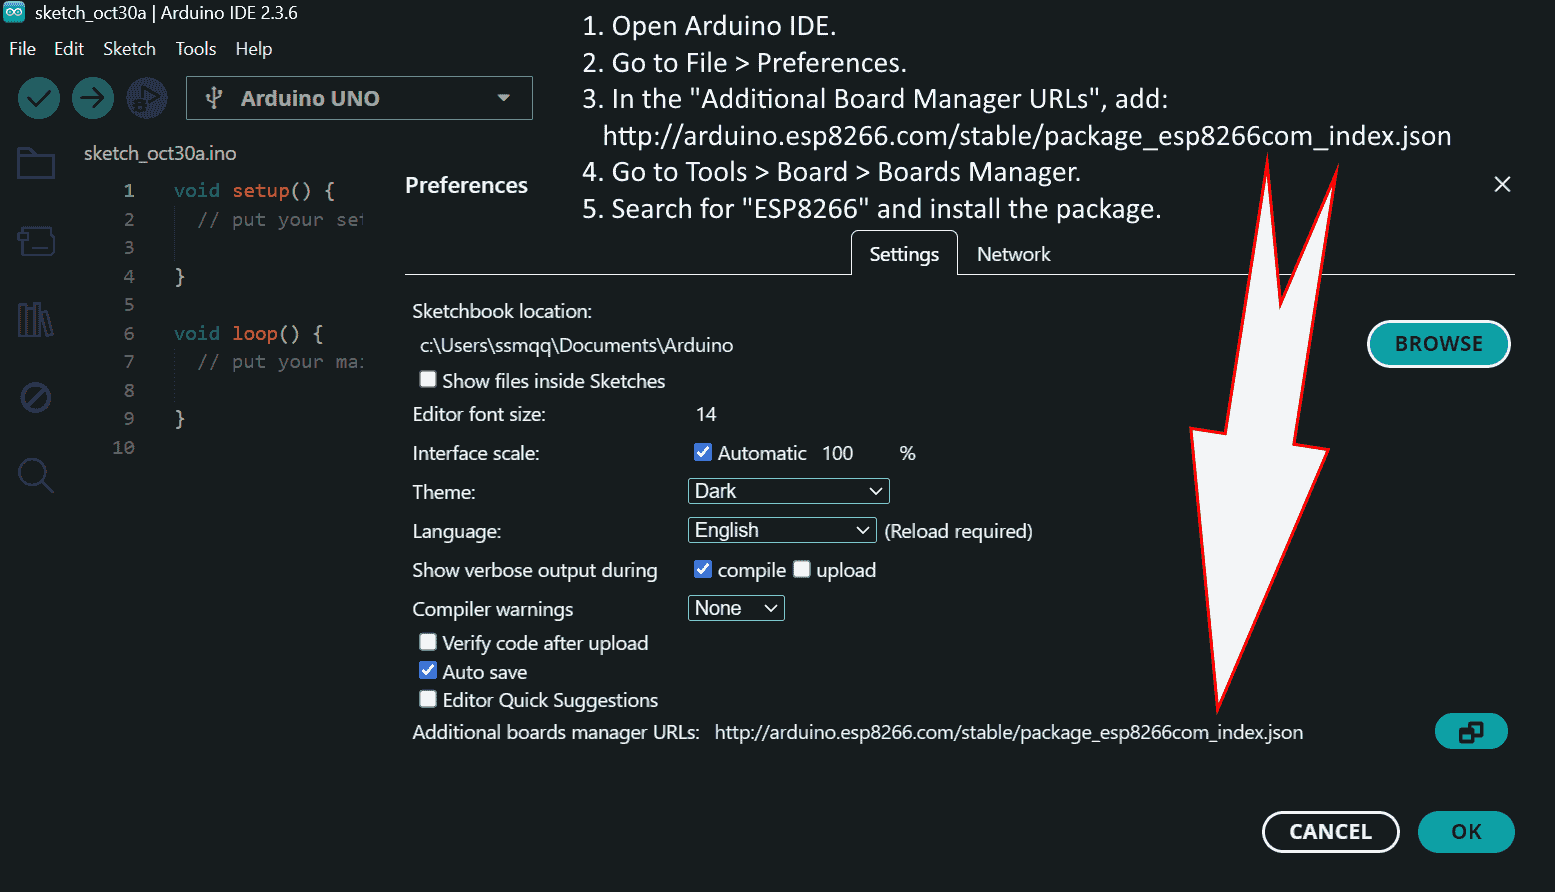
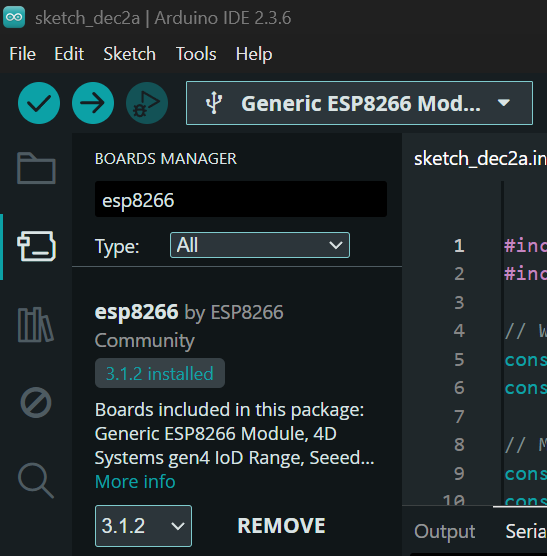
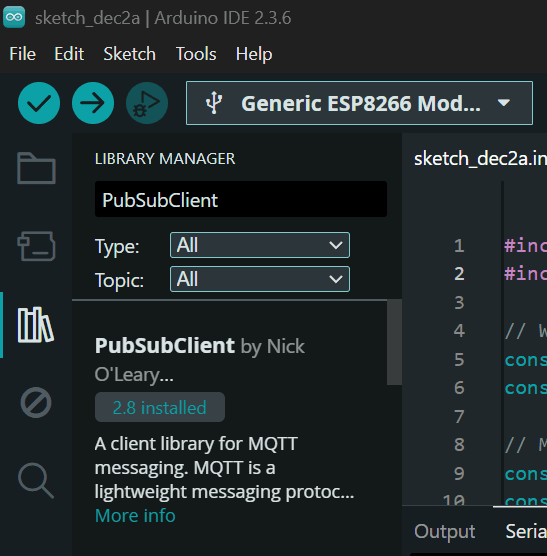
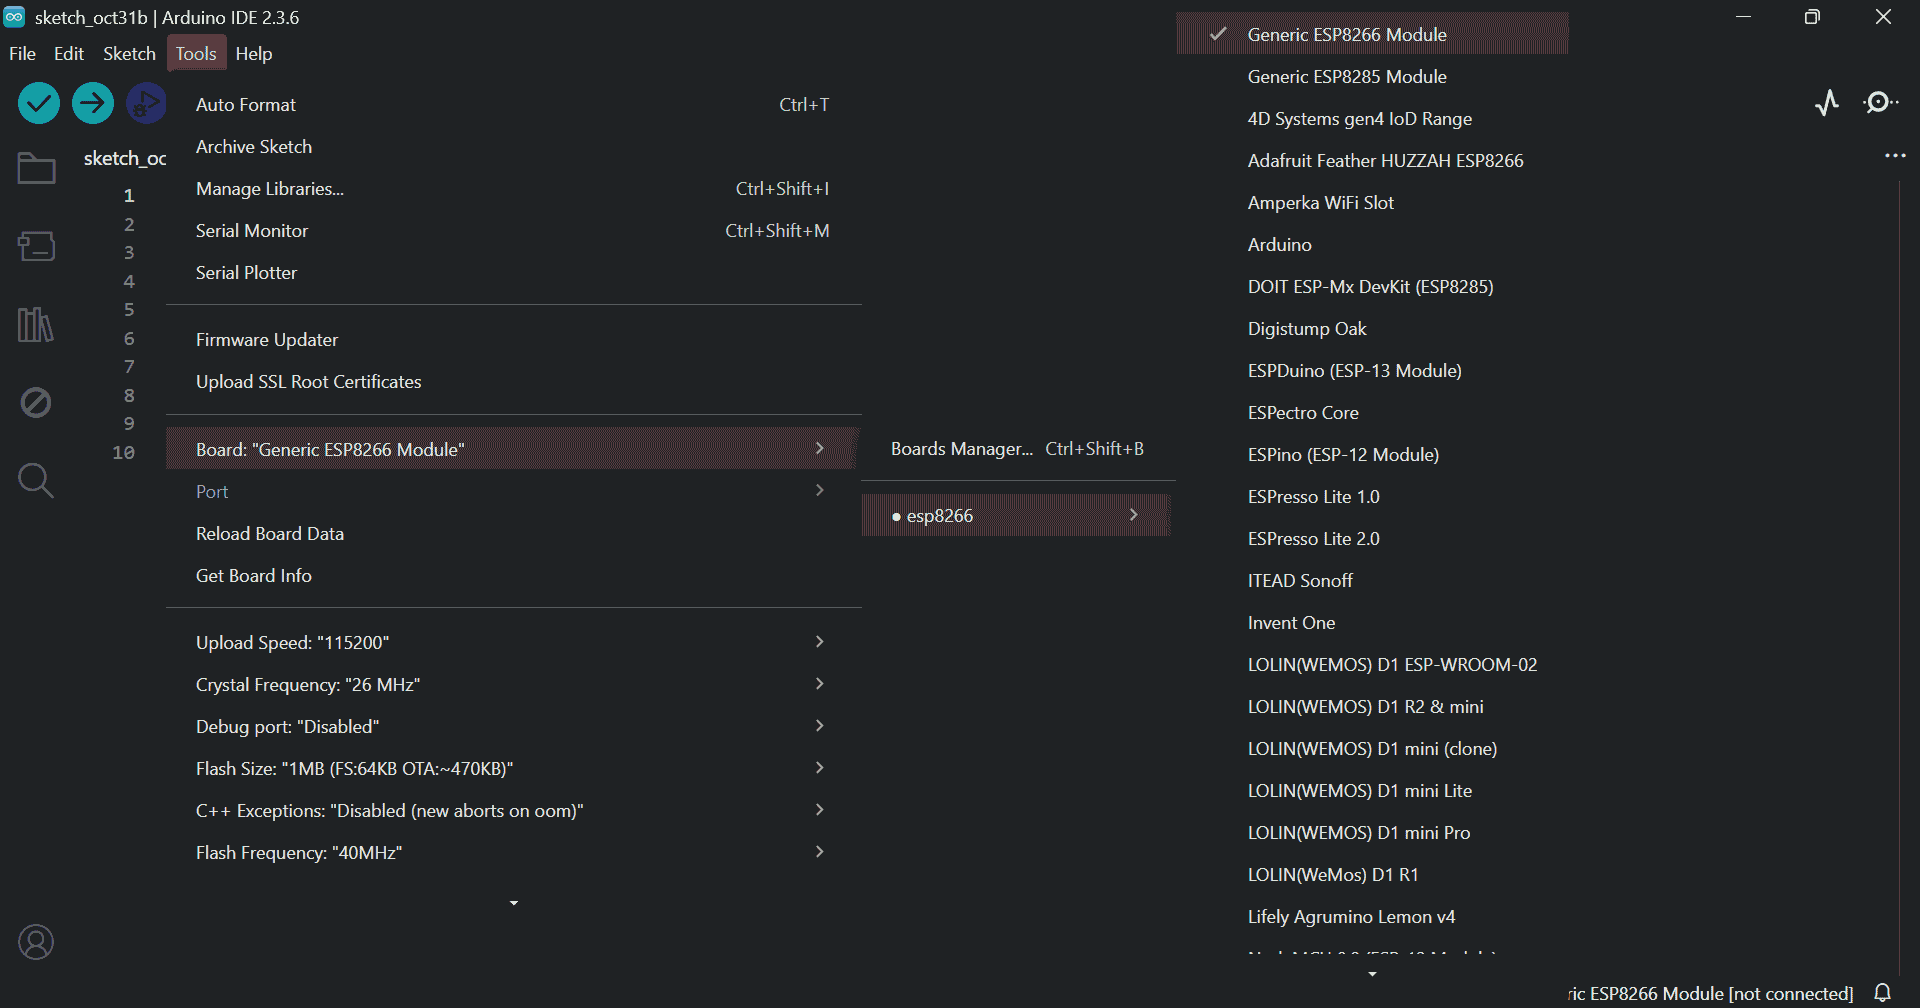
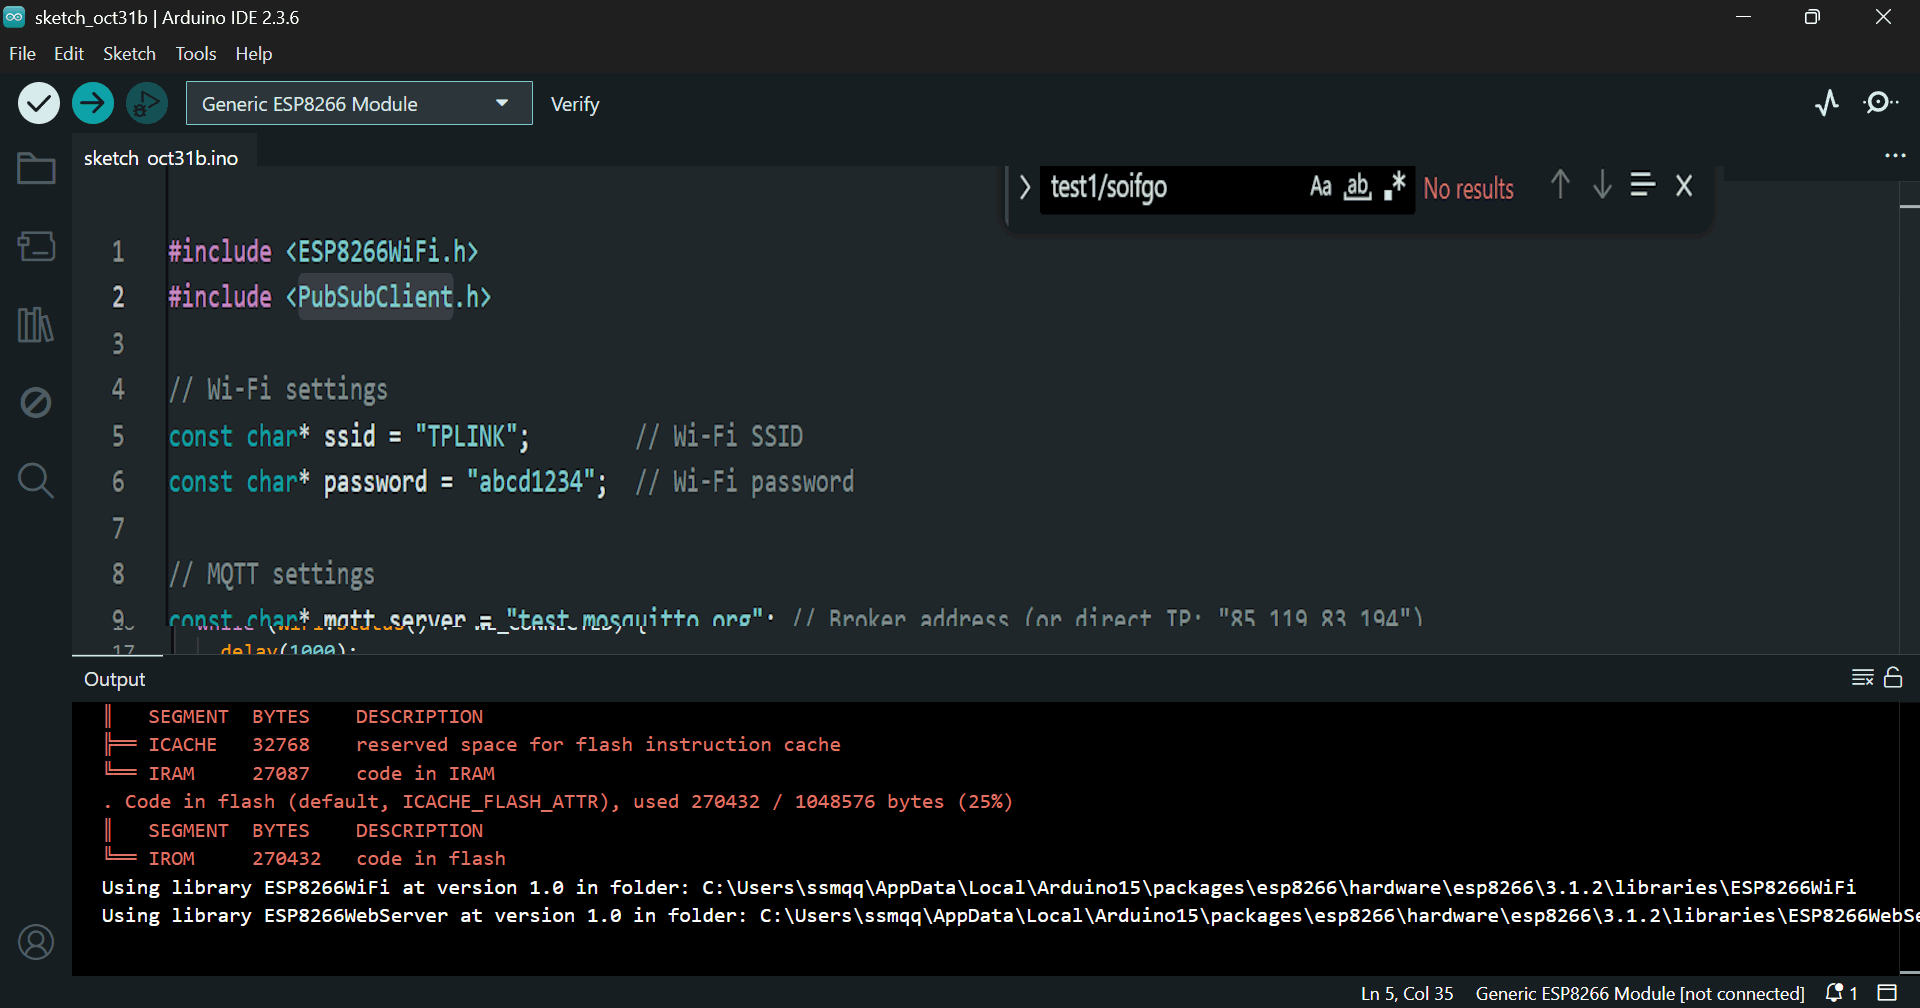
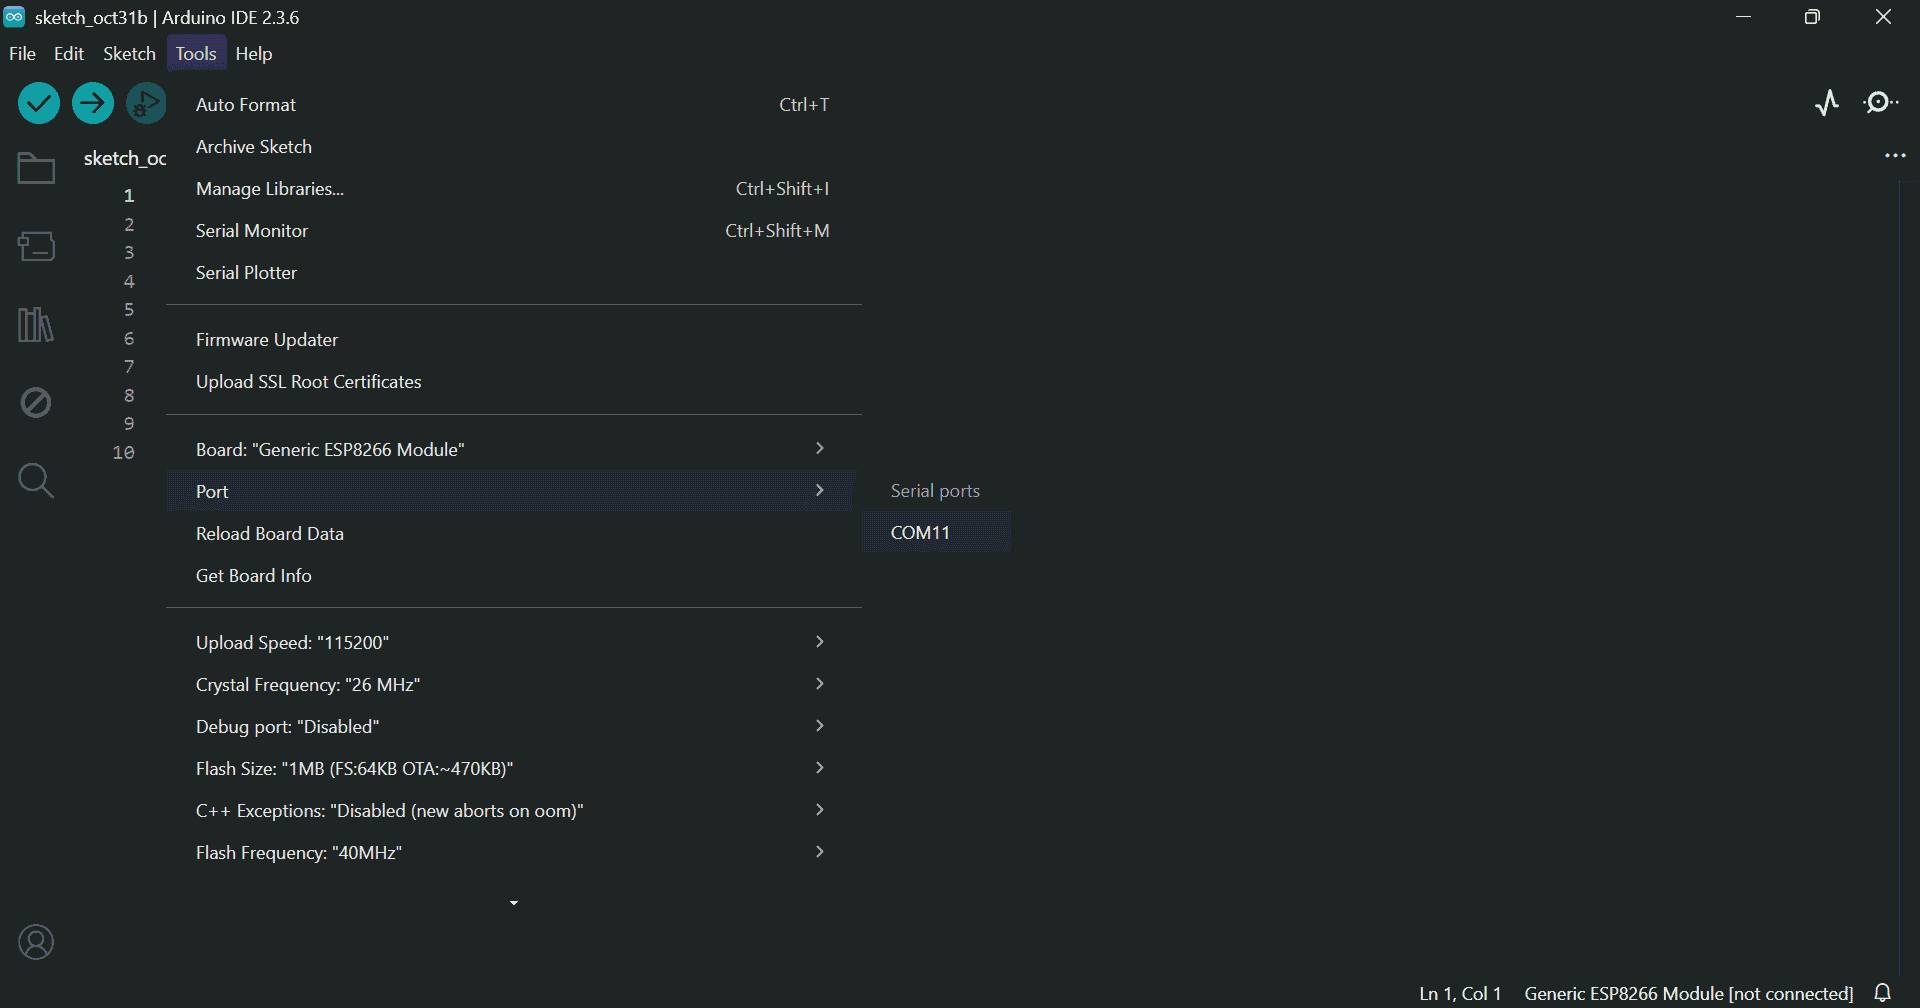
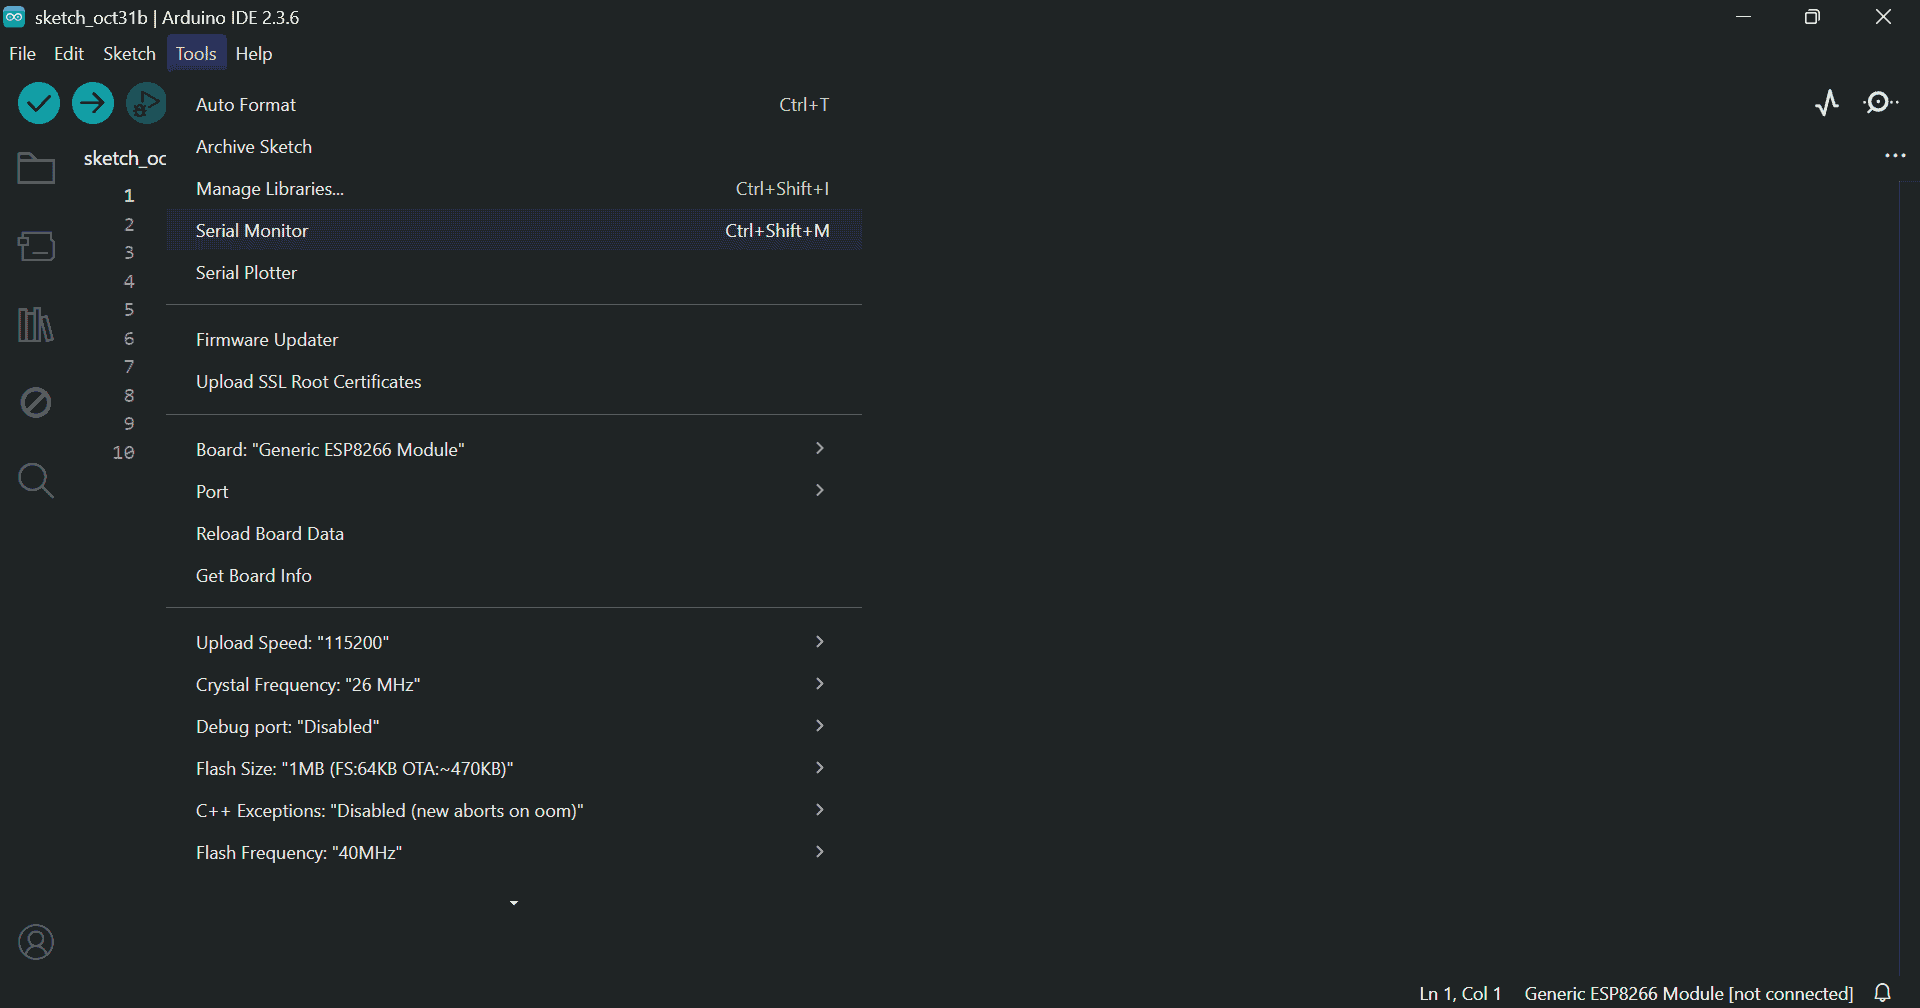
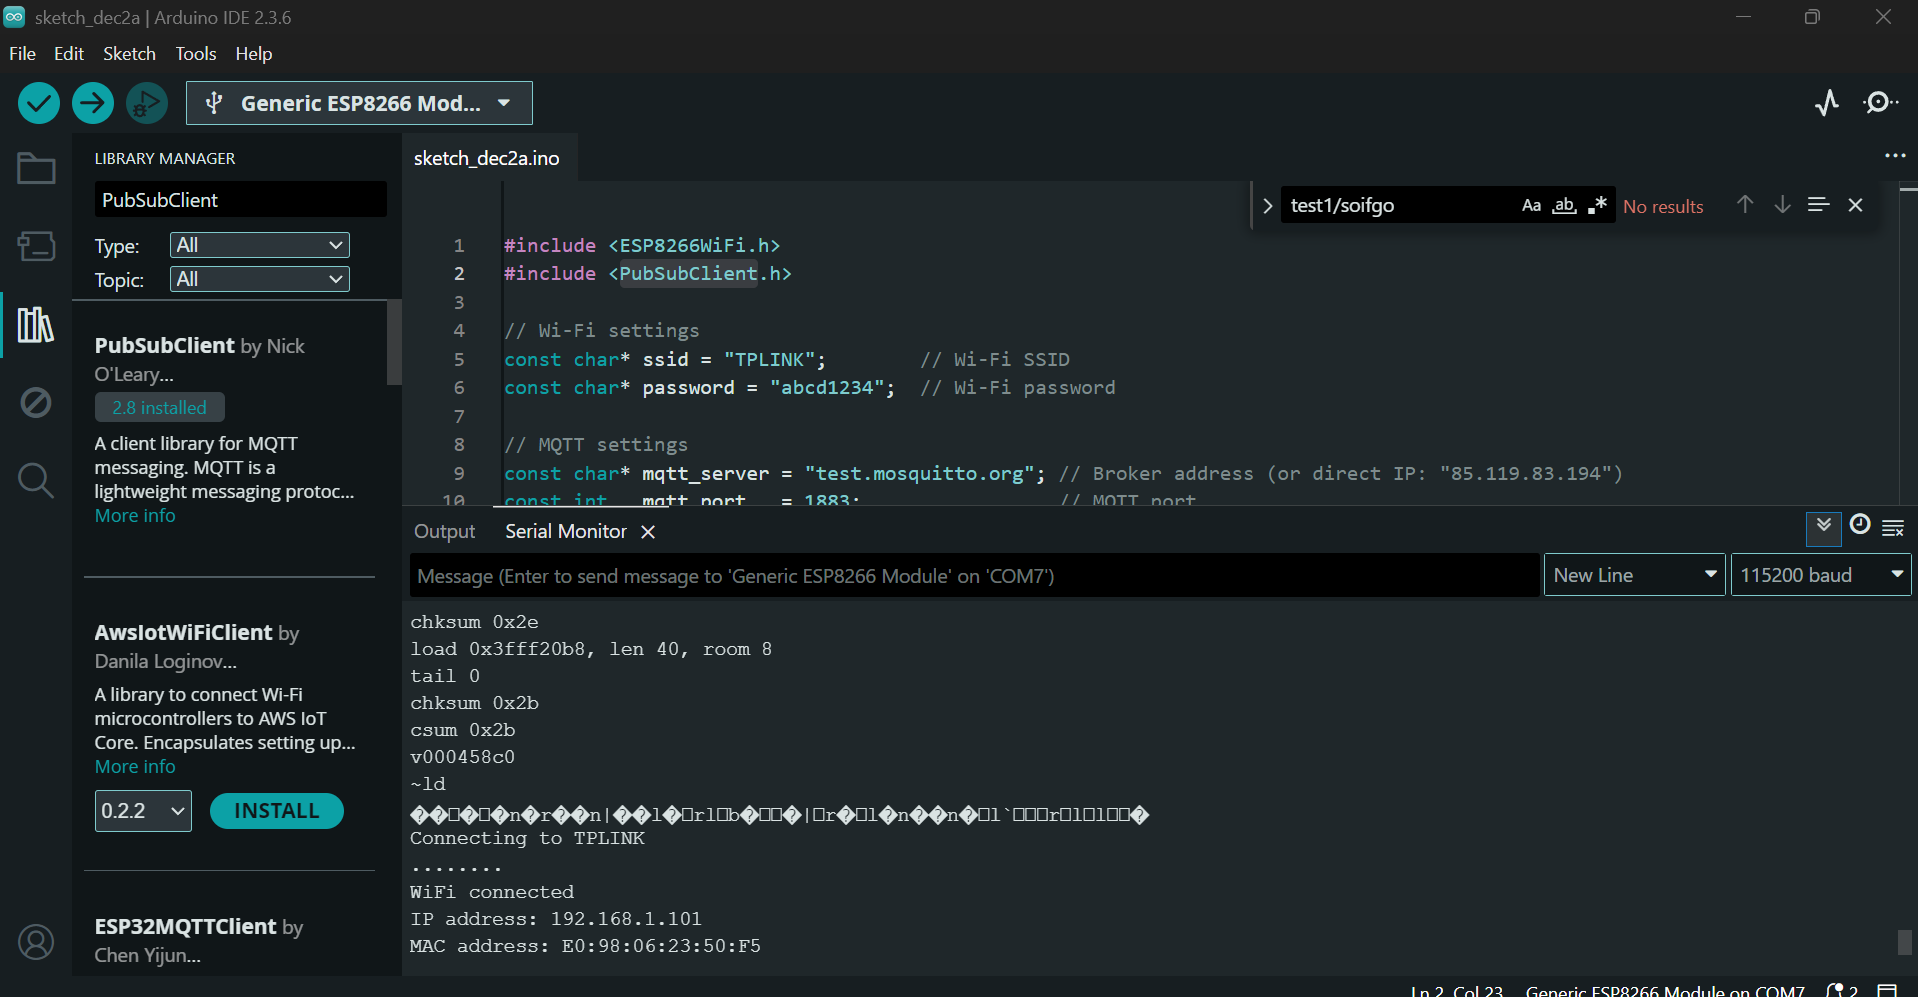
Install the required libraries and check the port and board settings:
#include <ESP8266WiFi.h>
#include <ESP8266WebServer.h>
#include <EEPROM.h>
#include <PubSubClient.h>
ESP8266WebServer server(80);
WiFiClient espClient;
PubSubClient client(espClient);
const char* mqtt_server = "test.mosquitto.org";
const int mqtt_port = 1883;
const char* mqtt_recv_topic = "soifgo_send";
String ssid = "";
String password = "";
String ap_pass = "";
unsigned long lastCheck = 0;
const unsigned long checkInterval = 15000;
int reconnectAttempts = 0;
const int maxReconnectAttempts = 4;
void handleRoot() {
String mac = WiFi.macAddress();
String html = "WiFi Setup
"
"MAC Address: " + mac + "
"
"
"
"
"
"";
server.send(200, "text/html", html);
}
void handleSaveWiFi() {
ssid = server.arg("ssid");
password = server.arg("pass");
for (int i = 0; i < 200; i++) EEPROM.write(i, 0);
EEPROM.write(0, ssid.length());
for (int i = 0; i < ssid.length(); i++) EEPROM.write(i+1, ssid[i]);
EEPROM.write(100, password.length());
for (int i = 0; i < password.length(); i++) EEPROM.write(i+101, password[i]);
EEPROM.commit();
server.send(200, "text/html", "WiFi Saved! Restarting...");
delay(1500);
ESP.restart();
}
void handleSaveAP() {
ap_pass = server.arg("ap_pass");
if (ap_pass.length() < 8) {
server.send(200, "text/html", "Error: Password must be at least 8 characters!");
return;
}
for (int i = 200; i < 400; i++) EEPROM.write(i, 0);
EEPROM.write(300, ap_pass.length());
for (int i = 0; i < ap_pass.length(); i++) EEPROM.write(i+301, ap_pass[i]);
EEPROM.commit();
server.send(200, "text/html", "AP Password Saved! Restarting...");
delay(2000);
ESP.restart();
}
void handleReset() {
for (int i = 0; i < 512; i++) {
EEPROM.write(i, 0);
}
EEPROM.commit();
server.send(200, "text/html", "EEPROM cleared! Restarting...");
delay(2000);
ESP.restart();
}
void loadCredentials() {
int ssidLen = EEPROM.read(0);
ssid = "";
for (int i = 0; i < ssidLen; i++) ssid += char(EEPROM.read(i+1));
int passLen = EEPROM.read(100);
password = "";
for (int i = 0; i < passLen; i++) password += char(EEPROM.read(i+101));
int apPassLen = EEPROM.read(300);
ap_pass = "";
for (int i = 0; i < apPassLen; i++) ap_pass += char(EEPROM.read(i+301));
}
void connectWiFi() {
loadCredentials();
bool connected = false;
if (ssid.length() > 0) {
WiFi.begin(ssid.c_str(), password.c_str());
Serial.print("Connecting to saved WiFi: ");
Serial.println(ssid);
int retries = 0;
while (WiFi.status() != WL_CONNECTED && retries < 5) {
delay(500);
Serial.print(".");
retries++;
}
if (WiFi.status() == WL_CONNECTED) {
Serial.println("\nConnected!");
Serial.print("IP: ");
Serial.println(WiFi.localIP());
connected = true;
} else {
Serial.println("\nWiFi connect failed.");
}
}
if (!connected) {
if (ap_pass.length() < 8) ap_pass = "12345678";
WiFi.softAP("ESP_Config", ap_pass.c_str());
Serial.println("Started AP: ESP_Config, password: " + ap_pass);
Serial.print("AP IP: ");
Serial.println(WiFi.softAPIP());
}
}
void mqttCallback(char* topic, byte* payload, unsigned int length) {
String message;
for (unsigned int i = 0; i < length; i++) {
message += (char)payload[i];
}
if (String(topic) == mqtt_recv_topic) {
Serial.println(message);
}
}
bool reconnectMQTT() {
if (!client.connected()) {
String clientId = "ESP8266Client-" + String(ESP.getChipId());
if (client.connect(clientId.c_str())) {
client.subscribe(mqtt_recv_topic);
Serial.println("MQTT connected");
reconnectAttempts = 0;
return true;
} else {
reconnectAttempts++;
Serial.println("MQTT reconnect failed");
return false;
}
}
return true;
}
void setup() {
Serial.begin(115200);
EEPROM.begin(512);
connectWiFi();
server.on("/", handleRoot);
server.on("/savewifi", handleSaveWiFi);
server.on("/saveap", handleSaveAP);
server.on("/reset", handleReset);
server.begin();
client.setServer(mqtt_server, mqtt_port);
client.setCallback(mqttCallback);
}
void loop() {
server.handleClient();
if (WiFi.status() == WL_CONNECTED) {
if (!client.connected()) {
reconnectMQTT();
}
client.loop();
}
if (millis() - lastCheck > checkInterval) {
lastCheck = millis();
if (WiFi.status() != WL_CONNECTED) {
Serial.println("WiFi lost → reconnecting...");
connectWiFi();
}
if (!client.connected()) {
if (!reconnectMQTT() && reconnectAttempts >= maxReconnectAttempts) {
Serial.println("Too many fails → Restarting...");
ESP.restart();
}
}
}
static String serialBuffer = "";
while (Serial.available()) {
char c = Serial.read();
if (c == '\n') {
serialBuffer.trim();
if (serialBuffer.length() > 0) {
int sepIndex = serialBuffer.indexOf(':');
if (sepIndex > 0) {
String topicPart = serialBuffer.substring(0, sepIndex);
String payloadPart = serialBuffer.substring(sepIndex + 1);
String fullTopic = "soifgo_" + topicPart;
client.publish(fullTopic.c_str(), payloadPart.c_str());
}
}
serialBuffer = "";
} else {
serialBuffer += c;
}
}
}
Download the program file:
📦 Download ESP8266_mqtt_Arduino.zipPaste the code into Arduino IDE. You can configure Wi-Fi settings before upload:
wifiName = "TPLINK";
wifiPass = "abcd1234";
Click Verify and then Upload in Arduino:
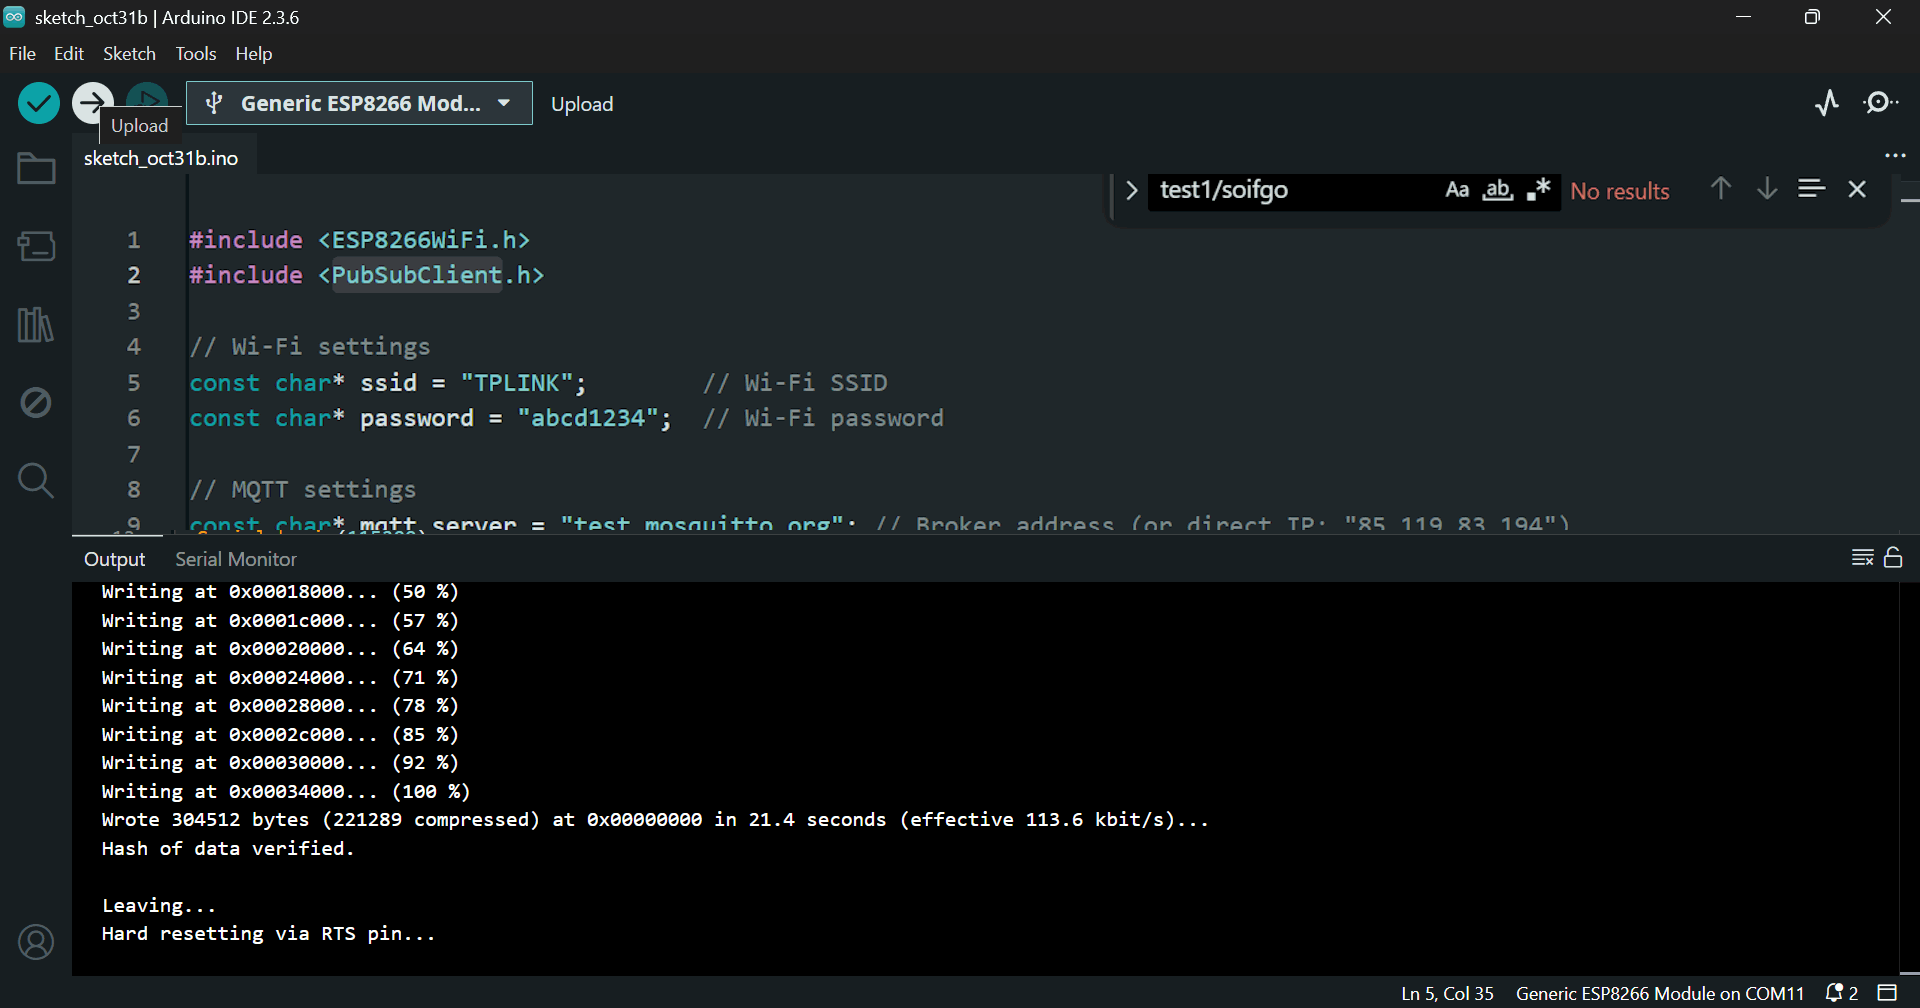
Restart the module. You should see output like:
In this step, you need to program your microcontroller. You have several options:
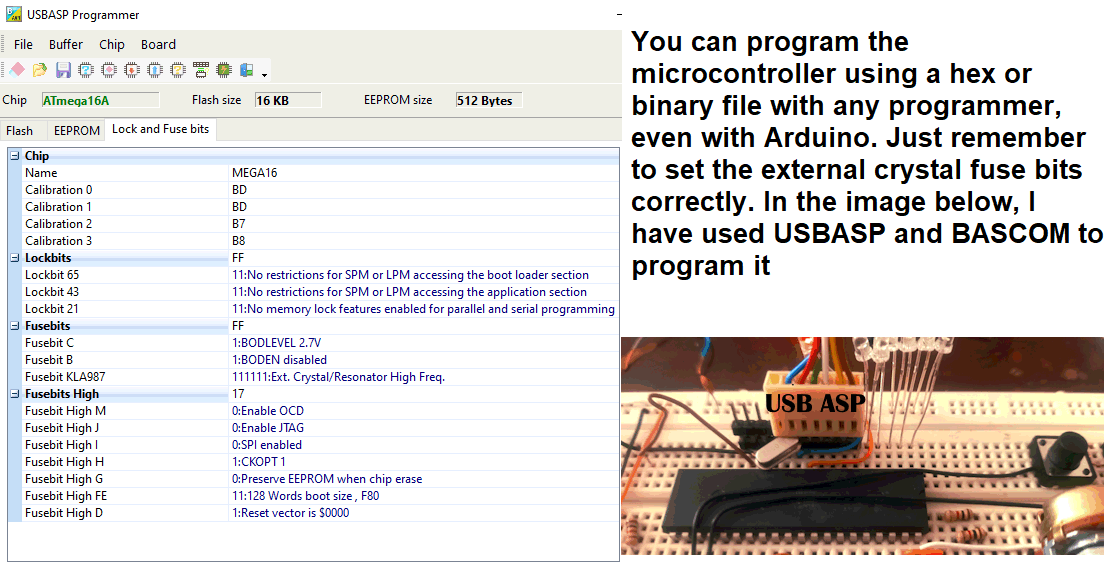
If you are not familiar with the Bascom language, don’t worry. Simply copy the provided Bascom Basic code and use an AI assistant to translate it into Arduino C++ or any other programming language you are comfortable with. This way, you can adapt the project to your preferred development environment.
⚠️ Important: Don’t forget to configure the oscillator fuse bits to use an external crystal. Without this setting, the microcontroller will not operate correctly.
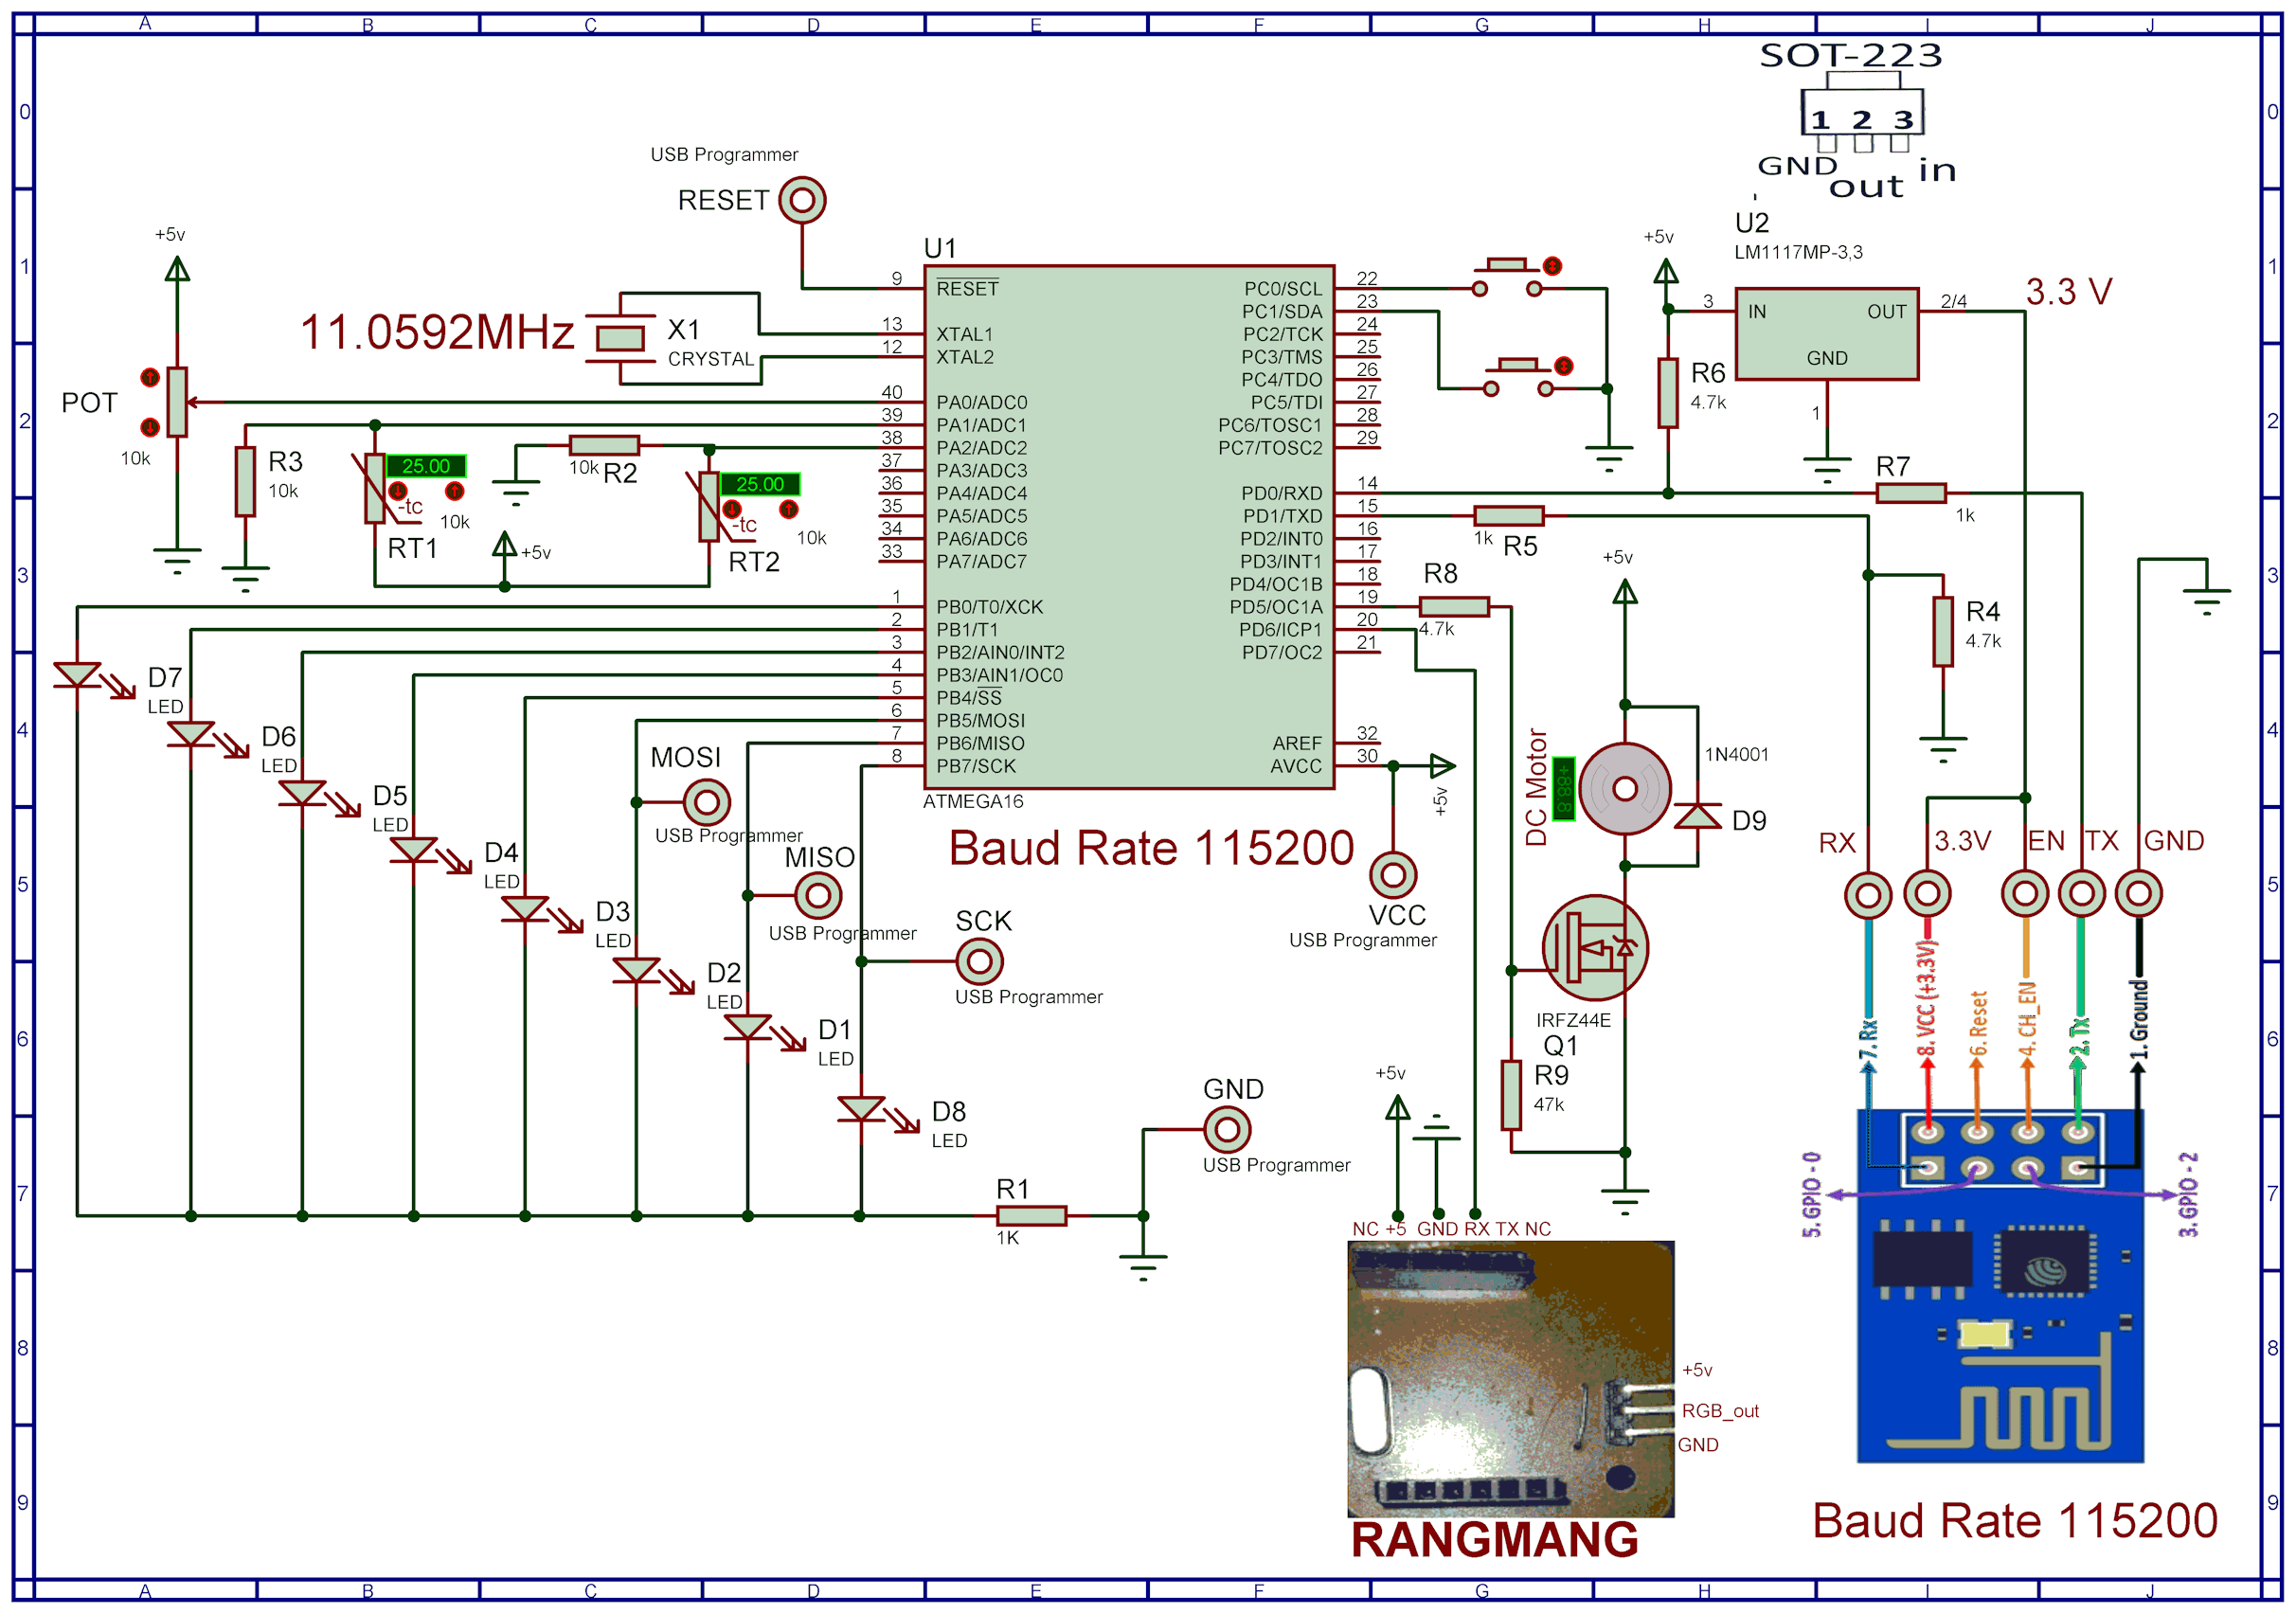
Program your ATmega16 using a compatible programmer:
$regfile = "m16adef.dat"
$crystal = 11059200

Config Adc = Single , Prescaler = Auto , Reference = Avcc
Config Timer1 = Pwm , Pwm = 10 , Compare_a_pwm = Clear_up , Compare_b_pwm = Clear_up , Prescale = 1


Config Portb = Output
   Portb = 0
Config Portc.0 = Input                                      'in key 1
Ddrc.0 = 0 : Portc.0 = 1

 Config Portc.1 = Input                                     'in key 2
Ddrc.1 = 0 : Portc.1 = 1

$baud = 115200

Enable Interrupts

 Config Serialin = Buffered , Size = 52 , Bytematch = 13

Dim Text , Feedback As String * 51
Dim Text2 As String * 4
Dim Text3 As String * 5
Dim Temp1 As Word
Dim Temp2 As Word
Dim Volt,pwm1aa As Word
Dim Volt2 As Single
Dim Step1 As Byte
Dim T1 As Byte
dim t2 as bit
Dim Ina As Bit
Dim Pb As Byte
config watchdog=2048
start watchdog
 Readeeprom portb , 1
  Waitms 1
  Readeeprom pwm1aa , 3
  Waitms 1
  Open "comd.6:9600,8,n,1" For Output As #1

  Print #1 , "soifgo"
pwm1a=pwm1aa
Main:
If Ina = 1 Then Goto Red
Waitms 100
If Ina = 1 Then Goto Red
  Incr Step1

Reset Watchdog

    If Step1 > 6 Then Step1 = 1


    Select Case Step1

        Case 1

            Volt = Getadc(0)
            Volt2 = Volt / 204.8

                   Print "volt:" ; Fusing(volt2 , "#.##")

        Case 2
              Temp1 = Getadc(1)

                   Print "temp1:" ; Temp1

        Case 3
            Temp2 = Getadc(2)

                   Print "temp2:" ; Temp2

        Case 4
              Pb.0 = Portb.7
              Pb.1 = Portb.6
              Pb.2 = Portb.5
              Pb.3 = Portb.4
              Pb.4 = Portb.3
              Pb.5 = Portb.2
              Pb.6 = Portb.1
              Pb.7 = Portb.0
                  Print "portb:" ; Bin(pb)

        Case 5
                  Print "pinc:" ; Pinc.0 ; Pinc.1
        Case 6
                 Print "feedback:" ; Feedback


    End Select


Goto Main

Serial0charmatch:
Input Text
Clear Serialin
 Ina = 1
Return


Red:
  Reset Watchdog

  Text = Trim(text)
  Text = Ltrim(text)


         Dim Z As Byte


     For Z = 1 To Len(text)
        If Mid(text , Z , 1) = ":" Then
           Mid(text , Z , 1) = "="
        End If
     Next

      Feedback = Text


      If Instr(text , "rang") > 0 Then
        Disable Interrupts
       Print #1 , Mid(text , 6 , 36)
        Enable Interrupts
       End If

   If Instr(text , "pwm1a") > 0 Then
      Text3 = Mid(text , 7 , 4)
      Pwm1a = Val(text3)
      Writeeeprom pwm1a , 3
   End If

  If Instr(text , "port") > 0 Then
     Text2 = Mid(Text , 7 , 1)
     Text = Mid(text , 5 , 1)


      if text2="0" then t2=0
      if text2="1" then t2=1

      t1=val(text)

      If T1 < 8 Then Portb.t1 = T2

   If T1 = 9 Then

          if t2=1 then
            Portb = 255
          End If

        if t2=0 then
          Portb = 0
        end if


   end if
    Writeeeprom Portb , 1

  End If

   Text = ""
   Text2 = ""
   Text3 = ""
   T1 = 222
   T2 = 0
Ina = 0


Goto Main
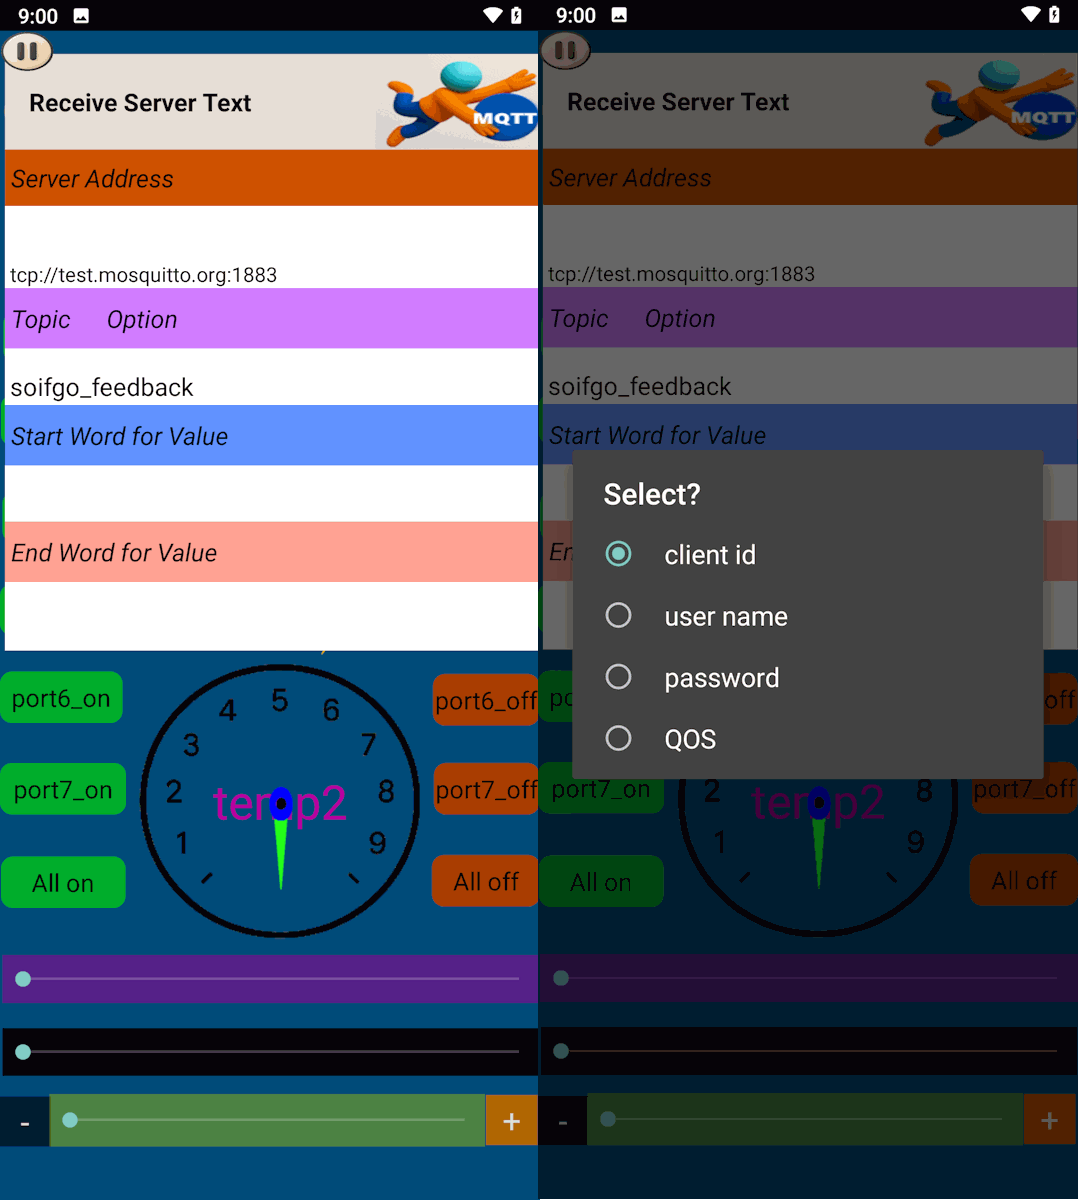
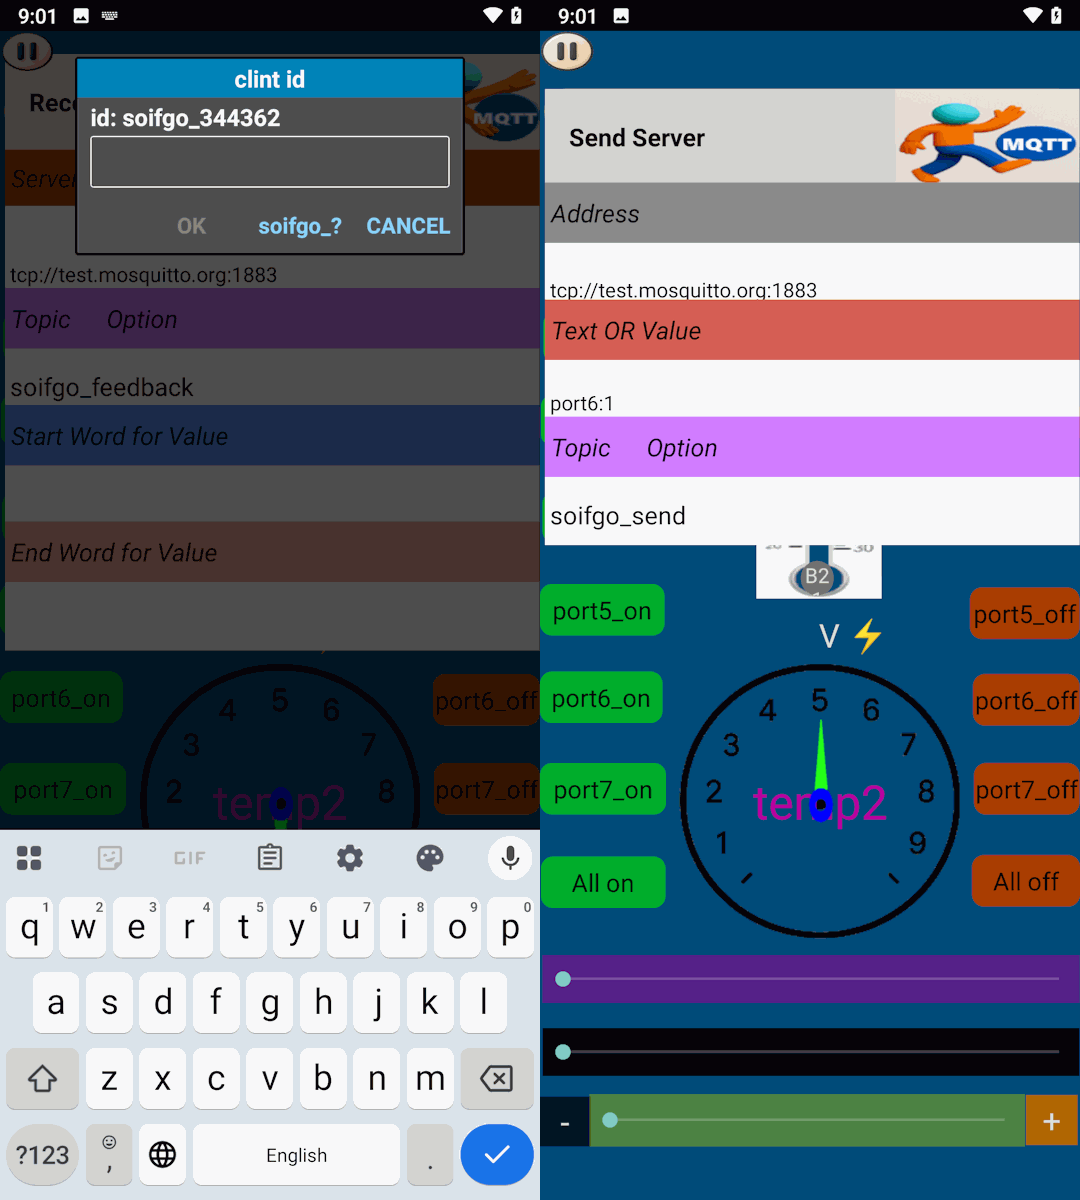
If you need advanced configuration, don’t worry. Simply click on the Topic Options label to access additional settings. Here you can adjust your username, password, client ID, and the connection quality (QoS). This ensures that your ESP8266 communicates reliably with the SoifGo MQTT broker.
Choose the QoS level based on how important message delivery is for your project. Higher QoS means more reliability, but also more overhead and slower performance.
This video demonstrates how to install and set up the ESP8266 Wi-Fi module. The process is the same across different setups, but make sure to use the provided MQTT Arduino sketch file. Click the link below to download the sample project:
📦 Download ESP8266_mqtt_Arduino.zipIf you don’t already have your own project, you can start with the prepared SoifGo sample file.
1. Extract the file and copy it into the device memory.
2. (Optional) Rename the p1 folder before placing it inside the SoifGo directory.
3. You can also move the file directly into the desired page folder within the SoifGo memory.
This way, you’ll have a ready-to-use setup without needing to create a project from scratch.
📦 Download soifgo fileThe module will attempt to connect to your router using the SSID and password you have provided. If the connection is successful, the device will remain stable and ready to use.
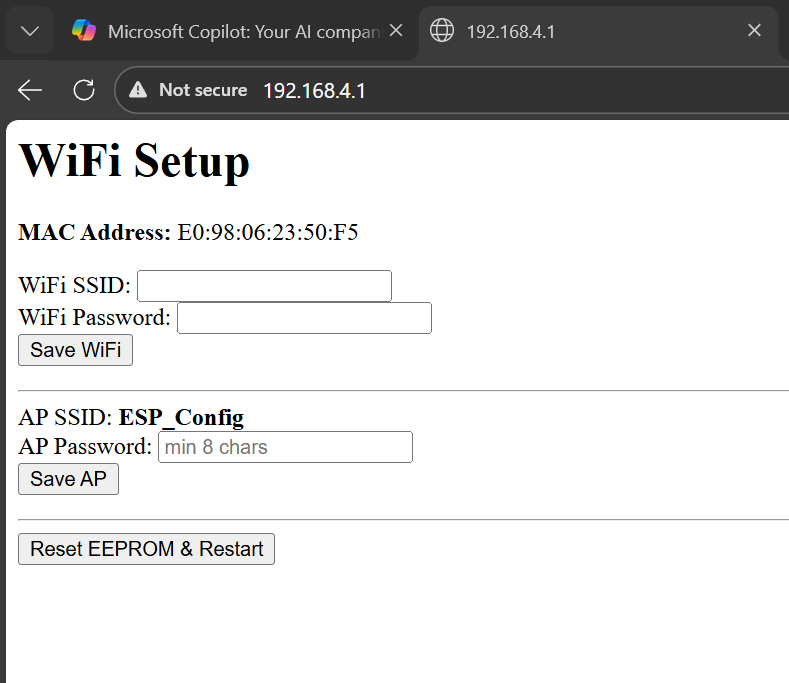
If the connection to the router fails (for example, due to an incorrect SSID or password),
the module will automatically switch to Access Point mode.
In this mode, a network named ESP_Config will be created.
192.168.4.1On this page, you can enter a new SSID and password, and also view the MAC Address of the module. After saving the information, the module will attempt to reconnect to your router and restart automatically.
If you need to clear all saved settings (SSID, password, AP password), use the Reset EEPROM & Restart button on the same page. This will:
If the AP password is not set or is shorter than 8 characters, a fallback password may be used to allow access, but it is not recommended for production.
If you plan to commercialize or sell this module:
This prevents unauthorized access and protects your users.
This example is configured using Mosquitto MQTT in public and free mode. For better security, it is recommended that you create your own private path with a username and password in Mosquitto, and then apply those credentials in Soifgo as well.
port3:1
If Instr(text , "port") > 0 Then
    Text2 = Mid(text , 7 , 1)   ' Operand: ON=1, OFF=0
    Text  = Mid(text , 5 , 1)   ' Port number → "3"
End If
Result: Port 3 ON
outmotor3:1
If Instr(text , "outmotor") > 0 Then
    Text2 = Mid(text , 11 , 1)  ' Operand: ON=1, OFF=0
    Text  = Mid(text , 9 , 1)   ' Port number → "3"
End If
Result: Motor output 3 ON
' Original:
Print "feedback:" ; Feedback
' → Topic in Soifgo: soifgo_feedback

' Changed:
Print "myfeedback123:" ; Feedback
' → Topic in Soifgo: soifgo_myfeedback123